Reviews
Great Father's Day Gift
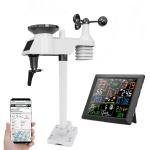
This is my first weather station and I am enjoying it very much. It seems well made (the test will be high winds and freezing rain I think.) Mounting and connection of sensors to display was straight forward.
Connecting the wifi (shares your weather station with others and allows display of weather data from your station onto your smartphone) was a bit of a challenge. Instructions were not very helpful. The breakthrough came from a review by Alberto Solis Berni (thank you Alberto). Translated from Italian, his review includes:
"I've seen a lot of comments saying that setting up Wifi is difficult. The difficult thing is not to configure it, it is to find in the manual how it is done, since you think that you will be after the steps of assembling it but not, they are where the configuration of underground weather is. It's very simple, it's what in home automation is called AP mode (access point mode, the device becomes a “wifi antenna” to which you can connect to configure it.
1- Activate AP mode on the console of the indoor station (screen where all the weather data comes out), to activate it, just press the min/max button 3-5 seconds.
2- When the Wi-Fi symbol flashes, on your computer or mobile phone look for a Wi-Fi network called weather station or something like that and you connect.
3- Once connected (even if it says it doesn't have internet) you open the browser and enter 192.168.5.1 and put your Wi-Fi and underground weather data (you have to register for free on wundergound.com)
4- And that's it, you'll see that the wifi icon on the internal station appears fixed with the 'e' symbol of internet explorer. The latter made me very funny. "
Number 3 above was key to getting the wifi connected for me.
I wish there was a description of the weather forecast section of the display - meaning of the symbology is not obvious.
09/06/2023
Related products
A$300.00 A$270.00
A$500.00 A$450.00
A$200.00 A$180.00
A$800.00 A$720.00
A$1,000.00 A$900.00
A$500.00 A$425.00
A$300.00 A$255.00
A$200.00 A$170.00
Recommended products
A$789.99 A$500.99
A$9.99
Related articles
Recommended articles
Popular searches
Great Binoculars For Hunting
Great Quality Security Cameras
Great Camera Bags For Hiking
Great Cheap Camera Bags
All Day Voice Recorder
Binoculars For Day And Night
Day And Night Monocular
Small Digital Camera With Great Zoom
Iphone Binoculars Great Optical Zoom
Security Camera Installation Great Neck

