When To Put Trail Cameras Out?
Trail cameras are one of the most versatile tools available to wildlife enthusiasts, hunters, and property owners aiming to better understand animal behavior and activity patterns. Whether you're tracking wildlife movements, monitoring your land, or scouting for hunting purposes, knowing when to put trail cameras out is key to maximizing their effectiveness. While this might seem straightforward, timing your trail camera deployment involves more than just throwing the device onto a tree and hoping for the best. Factors such as the season, the specific animal you’re targeting, and the purpose of your setup can impact how successful your trail camera placement is. In this article, we’ll dive into best practices, key considerations, and practical tips to help ensure you're using trail cameras at the optimal times to achieve your goals.
---
Understanding the Purpose of Your Trail Cameras
Before deciding when to set up your trail cameras, it’s crucial to define your primary objective. Are you scouting for deer during hunting season? Monitoring predators on your property? Observing seasonal wildlife behavior? Each purpose comes with its own optimal timing and setup strategy.
For hunting or wildlife management, your goal might be to preemptively monitor the movement patterns of certain animals across different times of the year. Conversely, if your purpose is purely recreational—such as capturing photos or videos of animals—you might focus instead on times when activity peaks, even if those times don’t align with hunting priorities.
Having a clear objective streamlines your planning and allows for more strategic placement of your cameras during the right seasons and timeframes.
---
Seasonal Timing for Trail Cameras
Seasonality plays a huge role in determining when to set out trail cameras. Animals change their behavior with the seasons due to factors like food availability, mating seasons, and weather. Here’s how the seasons generally affect trail camera setup:
Spring
Spring marks a period of regeneration and movement. Animals emerge from winter dens, and many begin actively seeking food to replenish their energy stores. It’s an excellent time to scout areas where new foliage, grasses, or water sources are attracting wildlife.
For hunters, spring is useful for observing turkey or deer behaviors in preparation for hunting seasons later in the year. Does often begin moving with their fawns in the late spring, so trail cameras can also help you identify bedding areas.
Key Tip: Position cameras near food sources like budding plant life or along game trails, as animals in spring are actively foraging.
---
Summer
The warmer months of summer are ideal for observing established patterns. Animals often follow routines during this time, traveling between food, water sources, and bedding areas. Summer is especially important for deer hunters, as bucks grow their antlers during this period, and their velvet-covered antlers can give clues about their health and potential size in the fall.
Pay attention to trails leading to agricultural fields, water holes, or mineral licks, as these become hotspots for wildlife during the heat of summer. Bear in mind that thick foliage can obstruct your camera view, so adjust angles or clear obstructing branches and vegetation.
Key Tip: Prioritize placing cameras along water sources during peak heat periods, especially in dry regions.
---
Fall
For many hunters, fall is the most critical time to put out trail cameras due to the impending hunting season. Deer, for example, begin entering their rut phase, where bucks become more active and cover greater distances in search of does. During pre-rut and rut phases, their movement becomes less predictable, and setting up cameras becomes vital for zeroing in on their travel corridors.
Trail cameras can also help track other species, such as turkey, elk, or predators like coyotes, during the fall transition. Monitor pinch points, heavily traveled trails, and scrape areas to gather data on animal behavior.
Key Tip: Begin placing cameras in late summer to monitor pre-rut activity and shift them as behavior changes during peak rut.
---
Winter
Winter presents some unique challenges and opportunities. Game often moves less during the winter months as they conserve energy, but they’ll still travel regularly to reliable food sources or bedding areas. If you’re monitoring predators or scavengers like coyotes, this season can yield valuable information, as they tend to roam more frequently searching for prey.
Battery life and weather durability are significant considerations for winter setups. Be prepared to use lithium batteries and weatherproof casings to ensure your cameras remain functional in cold temperatures.
Key Tip: Install trail cameras near known winter feeding sites, such as standing crops or feeders, as animals heavily rely on these dependable resources in the colder months.
---
Key Locations for Placement
Once you’ve determined the timing for deploying your cameras, optimizing their placement is the next critical step. Here are high-priority zones to consider for different times of the year:
1. Game Trails: Animals frequently use established trails as travel routes. Look for tracks, scat, or worn-down paths to identify these locations.
2. Water Sources: Ponds, streams, and waterholes are consistent gathering points for animals and can provide a snapshot of overall wildlife activity in the area.
3. Food Plots: Agricultural fields, natural food sources, or bait setups (where legal) attract a range of wildlife throughout the year.
4. Scrapes/Rubs: During the fall rut, bucks leave visible signs like scrapes and rubs to mark their territory. Cameras positioned here often capture close-up shots of trophy animals.
5. Pinch Points: Geographical bottlenecks like narrow trails, ridges, or dense vegetation channels are frequented by wildlife as they naturally funnel movement in these areas.
6. Bedding Areas: Be cautious not to overly disturb animals, but placing cameras on the outskirts of bedding zones can provide insights into behavior patterns.
---
How Long Should Cameras Be Left Out?
The length of time cameras should remain in the field depends on your goals. Short-term setups (1–4 weeks) are ideal for monitoring specific events like the rut or seasonal changes in animal movement. Longer-term placements can help you analyze more consistent patterns over several months.
It's also important to check your equipment periodically to retrieve valuable data, replace batteries, or adjust positioning. However, excessive human activity near your cameras can spook animals and disrupt natural behavior. Use scent-control measures or leave the area during the midday hours when animal activity is typically lower.
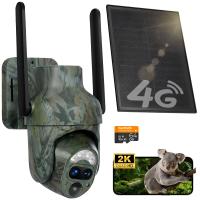
Key Tip: For high-activity zones, consider cellular-enabled trail cameras that can send images directly to your phone or device, reducing the need for frequent visits.
---
Factors Influencing Trail Camera Success
Several additional factors influence the success of your trail camera setups. Paying attention to these variables can significantly improve your data capture and image quality:
1. Camera Settings: Adjust sensitivity, resolution, and trigger speeds to match the activity level in a specific area.
2. Weather: Rain, snow, or wind can reduce camera effectiveness by obstructing the lens or triggering false captures due to moving vegetation.
3. Angle and Height: Positioning your camera at the correct angle and height is critical. For deer-level photos, aim to place the camera at chest height, angled slightly downward.
4. Camera Concealment: Reduce the risk of theft and avoid startling animals by camouflaging cameras with tree bark, foliage, or other natural elements.
5. Battery Life: Invest in lithium batteries for year-round setups, especially in extreme temperatures.
---
Using Data Collected by Trail Cameras
The images and videos recorded by trail cameras provide invaluable insights into animal behavior. By analyzing these patterns over time, you can identify peak movement periods, preferred travel routes, and seasonal activity changes. This data can be used for:
- Developing a tailored hunting strategy
- Improving land management practices
- Protecting livestock or crops from predators
- Enhancing wildlife photography efforts
Remember, trail cameras are not a one-size-fits-all solution. They work best when integrated into a broader strategy that considers habitat, objectives, and the unique characteristics of the land.
---
Conclusion
Deciding when to put trail cameras out involves a balance of timing, goals, and local conditions. By aligning your camera placements with the changing seasons and understanding the behavior of the animals you're monitoring, you can greatly improve your chances of success. Whether you're a hunter planning for the rut, a landowner keeping tabs on predators, or a nature enthusiast capturing wildlife photos, trail cameras are an incredible resource for enhancing your connection to the outdoors.
Take the time to plan strategically, monitor and adapt your placements as needed, and

