How To Voice Over Screen Recording?
Creating a professional voice-over for a screen recording is an essential skill in today’s digital world. Whether you're a content creator, educator, or business professional, the ability to produce engaging and informative voice-overs can elevate the quality of your tutorials, presentations, and product demos. However, many people struggle to get started or to achieve polished results when combining their voice with a screen recording. In this detailed guide, I’ll walk you through everything you need to know about voice-over for screen recordings, covering tools, techniques, and actionable tips to ensure stellar results.
---
Why Voice-Over Matters in Screen Recordings
A voice-over in a screen recording does more than narrate what is happening on screen. It serves as a guide, reinforcing the main points while keeping the audience engaged. Without a good voice-over, even the most visually remarkable screen recording might fail to communicate its purpose effectively.
Voice-overs provide personality, clarity, and emotion to your tutorial or presentation. Additionally, they help fill context gaps that visuals alone may leave behind.
---
Step 1: Prepare Your Content and Script
A professional voice-over starts with preparation. Before you even hit the “record” button, think about the following:
Know Your Audience

Understanding your audience is crucial because it influences the tone, complexity, and pacing of your voice-over. A corporate audience may appreciate a formal, clear tone, whereas a younger, tech-savvy crowd would prefer a casual, conversational style.
Write a Script
It’s tempting to improvise, but even experienced voice-over artists rely on scripts to stay concise and minimize errors. Your script should match the flow of your screen recording, ensuring synchronization with actions, slides, or events happening on-screen. Keep it simple, avoid unnecessary jargon, and prioritize clarity.
Rehearse Your Script
Practice reading the script a few times before recording to get comfortable with the material. Ensuring you know the pacing of your words will help the process feel smoother and sound more polished.
---
Step 2: Choose Your Tools
Choosing the right tools for your voice-over production is critical. While professional-grade tools can yield impressive results, free or affordable options work just as well for most users.
Screen Recording Software
Some popular tools that integrate screen recording and voice-over functionality include:
- Camtasia: Designed for professional video editing and screen recordings, Camtasia allows you to add voice-overs effortlessly.
- Loom: A simple, browser-based option perfect for beginners.
- OBS Studio: Free, open-source software for more advanced users.
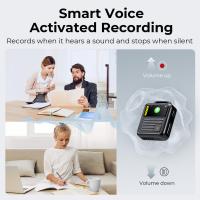
Microphone
The quality of your voice-over heavily depends on your microphone. While built-in laptop microphones can suffice for casual use, a budget-friendly external microphone will drastically improve clarity and professionalism. Options like the Blue Yeti or Audio-Technica AT2020 are excellent choices.
Audio Editing Software
Sometimes, screen recording software doesn’t allow detailed audio adjustments. Dedicated audio editing tools like Audacity (free) or software like Adobe Audition provide more control for refining your recording.
Headphones
Invest in a good set of headphones to clearly hear any background noise, pops, or inconsistencies when editing your audio.
---
Step 3: Record Voice-Over Separately or Simultaneously
You have two options when adding a voice-over to screen recordings: recording it in real-time during the screen capture, or recording it afterward and syncing it with the video. Let’s explore both:
Recording Simultaneously
When recording the voice-over while capturing your screen, you narrate actions happening in real-time.
Pros:
- Saves time since everything is done in one step.
- Good for informal or live explanations.
Cons:
- Higher chance of errors, such as hesitations or stumbles.
- Limited flexibility for post-production improvements.
To record simultaneously, make sure your recording software supports live audio input and that your microphone is configured properly within the app.
Recording Separately
This approach involves first capturing the screen recording silently, then recording your voice-over afterward.
Pros:
- Greater control over audio quality, clarity, and timing.
- Errors in your narration can be re-recorded without affecting the original screen capture.
- Ideal for complex topics that require precise timing.
Cons:
- More time-consuming due to the additional steps.
For separate recordings, you’ll need to use editing software to sync audio with video seamlessly. A video editor like iMovie, Camtasia, or Adobe Premiere Pro can help with this.
---
Step 4: Record Your Voice
Now that your tools are ready, it’s time to record. Consider the following tips to ensure a professional result:
Optimize Your Recording Environment
- Eliminate Background Noise: Choose a quiet room and minimize ambient noise. Place your microphone away from keyboards, fans, or other noise sources.
- Use a Pop Filter: A pop filter (a screen placed in front of the microphone) reduces harsh "p" and "b" sounds that occur naturally while speaking.
- Add Sound Absorption: If your space is echo-prone, soft furnishings like rugs, curtains, or even foam panels can absorb reverberation.
Maintain Good Mic Technique
- Position the microphone 6-12 inches from your mouth for optimal clarity.
- Speak directly into the microphone but avoid breathing into it by angling it slightly downward.
Find the Right Tone
Your voice should match the purpose of your screen recording:
- Enthusiastic and upbeat for sales demos or team updates.
- Calm and instructive for tutorials or how-to guides.
- Formal and professional for business presentations.
Speak Clearly
Enunciate your words and maintain consistent volume throughout the recording. Take breaks when needed and pause for a second or two between sentences to allow easier editing later.
---
Step 5: Edit and Sync Audio
Editing is where your voice-over begins to take shape and align perfectly with your screen recording.
Trim and Clean the Audio
Use your audio editor to:
- Remove unnecessary pauses, filler words like “uh” or “um,” and background noise.
- Apply noise reduction filters and equalization to create a clean, polished sound.
Sync Voice-Over with Screen Actions
For separate recordings, match your narration to what’s happening on the screen. Precise editing ensures that your words align with the corresponding visuals for maximum clarity.
Adjust Volume
Balance the audio levels to make sure the voice-over is neither too loud nor too soft compared to any background music or on-screen clicks.
Add Background Music (Optional)
Adding background music can enhance your recording's professional feel, but ensure it doesn’t overpower the narration. Choose royalty-free tracks that fit the tone and purpose of your video.
---
Step 6: Test and Finalize
Before publishing your screen recording, test it thoroughly:
- Watch the video while listening with headphones and speakers to identify any inconsistencies.
- Consider getting feedback from a colleague or friend who can offer a fresh perspective.
Once satisfied, export your video in a high-quality format suitable for your platform (e.g., MP4 for most online platforms).
---
Tips for Delivering a Professional Voice-Over
1. Warm Up Your Voice: Perform basic vocal warm-ups or drink warm water to relax your vocal cords.
2. Pace Yourself: Speak at a steady pace that allows viewers to absorb information. Avoid rushing, especially during detailed explanations.
3. Emphasize Key Points: Use slight variations in pitch, emphasis, and pauses to highlight important information.
4. Avoid Monotony: Inject energy and emotion into your narration while remaining natural.
---
Adding a professional voice-over to your screen recordings can make a profound difference in how your content is received. By preparing thoroughly, choosing the right tools, and following best practices for voice recording and editing, you can create an engaging video that captures your audience’s attention.
Whether you're creating educational content, training materials, or product demonstrations, investing time in high-quality voice-over is worth it. With practice, you’ll not only streamline the process but also develop a confident and captivating voice that resonates with your audience. So go ahead, start recording, and elevate your content to impressive new heights!

