How To Use A Microscope Biology?
Mastering the use of a microscope is a fundamental skill in the study of biology, allowing students, researchers, and hobbyists to explore the microscopic world that underpins life itself. For anyone curious about the structural organization of cells, the intricate pathways of tissues, or the behavior of tiny microorganisms, knowing how to use a microscope properly is the first step toward unlocking a wealth of biological knowledge.
This guide will provide both beginners and experienced users with comprehensive instructions and practical tips for using a microscope effectively. By covering the different types of microscopes, step-by-step operational guidance, troubleshooting tips, and best practices, you’ll gain both confidence and precision in your microscopic observations.
---
Understanding the Basics: Types of Microscopes
Before diving into how to use a microscope, it’s important to choose the right type based on your needs. The two most common microscopes in biology are:
1. Compound Light Microscope:
- Magnifies objects using a system of multiple lenses and light.
- Suitable for viewing thin slices of biological specimens such as cells, tissues, and microorganisms.
- Commonly used in schools, universities, and labs due to its accessibility.
2. Stereomicroscope (Dissecting Microscope):
- Provides a three-dimensional view of specimens at lower magnification.
- Best for observing the surface of larger, opaque objects like insects, plant structures, and small organisms.
For this guide, we'll focus primarily on the compound light microscope, as it’s the most widely applicable in biology labs.
---
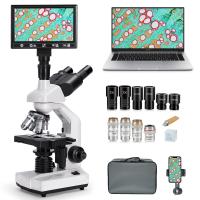
Getting Started: Microscope Components
To effectively operate a microscope, it’s key to familiarize yourself with its components. Here’s a quick rundown of the essential parts:
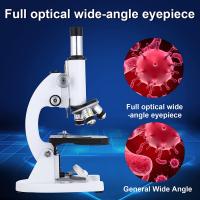
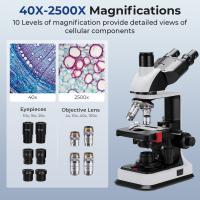
- Eyepiece (Ocular Lens): The lens you look through, usually magnifying 10×.
- Objective Lenses: Lenses of varying magnification (e.g., 4×, 10×, 40×, 100×), mounted on a revolving nosepiece.
- Stage: The flat surface where the slide is placed, often with metal clips to secure it.
- Diaphragm/Iris: Controls the amount of light that passes through the specimen.
- Light Source/Illuminator: Provides the illumination, either a mirror or an in-built lamp.
- Coarse and Fine Adjustment Knobs: Used to focus the image by raising or lowering the stage.
- Base and Arm: Provide support and structural stability to the microscope.
Knowing these components ensures that you can navigate your microscope seamlessly during practical use.
---
Step-by-Step Guide: How to Use a Microscope
Now that you're acquainted with the parts, let’s delve into a step-by-step guide for using a microscope efficiently.
1. Set Up Your Microscope
- Place the microscope on a flat, stable surface in a well-lit area.
- Plug in the microscope if it has an inbuilt light source, or ensure an adequate external light source is available.
2. Prepare the Slide
- Obtain a clean, dry slide.
- If observing a biological specimen, use a thin slice so light can pass through easily (e.g., onion epidermis, cheek cells, or pond water organisms).
- Cover the specimen with a cover slip to prevent contamination and drying out. Add a drop of water or stain if necessary—stains, like methylene blue or iodine, enhance contrast.
3. Begin with Low Power
- Rotate the nosepiece so the lowest power objective lens (4× or 10×) clicks into position.
- Place the slide on the stage, securing it with the stage clips, and center the specimen over the light source.
- Use the coarse adjustment knob to lower the stage as far as it will go.
4. Focus the Image
- Turn on the illuminator and adjust the diaphragm to control the brightness.
- Look through the eyepiece and slowly raise the stage using the coarse adjustment knob until the specimen comes into view.
- Refine the focus using the fine adjustment knob, ensuring a clear image.
5. Increase Magnification
- Once the specimen is in focus at low power, switch to a higher power objective lens (e.g., 40×).
- Make fine adjustments as needed, and center the area of interest before switching to the next level of magnification.
6. Use Oil Immersion (Optional, for 100× Objective Lens)
- For extremely high magnification, apply a drop of immersion oil directly onto the slide. Carefully lower the 100× lens until it touches the oil.
- Do not use oil with any other lens—it can damage them.
- Clean up the oil thoroughly after use with lens paper and appropriate cleaning solutions.
7. Record Observations
- Draw or photograph what you see under the microscope for documentation.
- Note down magnifications, stains used, and any notable observations about the specimen.
---
Troubleshooting Common Issues
Microscopy is a precise science, and minor missteps can obstruct clear viewing. Here are solutions to common issues:
1. Blurry Image:
- Ensure the slide is clean and properly secured.
- Use the fine adjustment knob for sharper focus, especially at high magnifications.
- Clean the lenses with lens paper—never use fabric or tissue.
2. Too Dark or Bright:
- Adjust the diaphragm or brightness of the light source.
- Ensure the light path is unobstructed.
3. Specimen Not Centered:
- Reposition the slide so the area you want to observe is centered directly under the lens.
4. Oil Spill or Smudges:
- Use immersion oil only with the 100× objective lens and clean up immediately afterward.
---
Tips for Better Results
To optimize your microscopy skills, keep these tips in mind:
1. Practice Regularly: Familiarity with your microscope improves observation speed and accuracy.
2. Handle Lenses With Care: Always clean lenses with designated lens paper to avoid scratches.
3. Keep a Lab Notebook: Document your observations and measurements for future reference.
4. Explore Different Stains: Experiment with biological stains to enhance visualization of specific cellular components, like the nucleus or cell wall.
5. Stay Organized: Properly label all slides and specimens to track your work effectively.
---
Applications in Biology
The ability to use a microscope is indispensable in virtually all fields of biological science. Here are just a few of its applications:
- Cell Biology: Understanding the structure and function of cells, such as observing mitosis or identifying organelles.
- Microbiology: Studying microorganisms, including bacteria, fungi, and protozoa.
- Histology: Examining tissue samples to study how organs are organized and functions.
- Ecology: Analyzing microorganisms in water samples or soil to assess their role in ecosystems.
- Molecular Biology: Visualizing DNA, RNA, or proteins via advanced microscopy techniques.
By mastering microscopy, biologists can uncover the microscopic details that provide insights into life at its smallest levels.
---
Conclusion
Using a microscope effectively opens doors to a deeper understanding of biology. From preparing slides and focusing attention on minute details to troubleshooting challenges and recording observations, microscopy is both an art and a science. As you practice these techniques and develop your skillset, you’ll find yourself better equipped to make meaningful discoveries in biology.
Microscopes bring the unseen world into view, allowing us to unravel the intricate systems that sustain life. Whether you’re examining the vibrant chloroplasts of a plant cell or tracking the movement of microorganisms, this tool will continue to be your gateway into exploring the wonders of biology.

