How To Connect Multiple Wifi Cameras?
Setting up and connecting multiple Wi-Fi cameras can bring significant convenience, whether you’re securing your home or monitoring an array of spaces for professional purposes. However, many people struggle with the technicalities of establishing these connections and ensuring they work seamlessly as part of a broader network. In this article, we’ll explain the step-by-step process for connecting multiple Wi-Fi cameras, covering everything from initial planning to troubleshooting. By the end, you’ll have all the tools and knowledge you need to build a reliable surveillance system that suits your needs.
---
Why Connect Multiple Wi-Fi Cameras?

Before jumping into the how-to, it’s important to understand _why_ setting up multiple cameras is advantageous. Wi-Fi cameras are incredibly versatile—they don’t require hardwiring and can often integrate with smart home systems. By using more than one camera, you can dramatically increase coverage, whether for security, monitoring pets, or overseeing different rooms or outdoor spaces. Properly connecting and coordinating several cameras ensures a smoother setup and eliminates blind spots.
---
Step 1: Plan Your Surveillance System

The first step is always planning. Skipping this stage often leads to compatibility issues, connectivity bottlenecks, and subpar performance. Consider the following:
1. Determine Your Camera Placement
Make a list of the areas you want to monitor. Outdoor cameras will have different requirements (such as weather resistance) compared to indoor cameras. Knowing the areas to cover will also help estimate the number of cameras you need.
2. Evaluate Wi-Fi Signal Strength
Wi-Fi cameras rely on a strong, stable internet connection. Check the Wi-Fi signal in all intended camera locations using tools like a smartphone app to measure signal strength. If certain areas show weak Wi-Fi coverage, plan to extend coverage with Wi-Fi range extenders or a mesh Wi-Fi system.
3. Choose Your Equipment
Not all Wi-Fi cameras are created equal. You’ll need to decide between brands, features like motion sensors, night vision, and storage options (cloud vs. local storage). Importantly, ensure that all cameras are compatible with your existing Wi-Fi bandwidth and smart systems (if applicable).
---
Step 2: Prepare Your Network

A robust Wi-Fi network is crucial for supporting multiple cameras. Without it, video feeds may freeze or connections could drop entirely. Here’s how to optimize your network for multiple Wi-Fi cameras:
1. Upgrade Your Router if Necessary
Older routers may not support multiple high-definition video streams simultaneously. Invest in a dual-band or tri-band router designed to handle heavier loads. Modern routers also feature better range and throughput for multiple connected devices.
2. Assign a Separate Network for Cameras
If your router supports dual SSIDs (network names), consider setting up a guest network specifically for the cameras. This separates surveillance data from your main network traffic and improves performance while minimizing potential security risks.
3. Check Bandwidth Requirements
Estimate the bandwidth you’ll need for all cameras combined. For example, a 1080p Wi-Fi camera may use around 2 Mbps, so 5 cameras could total 10 Mbps. Ensure your internet plan and network can support this, especially if you’re running other high-bandwidth devices simultaneously.
4. Use Static IP Addresses for Cameras
Assigning static IP addresses to your cameras ensures the devices don’t lose their connection over time, which can sometimes happen with dynamic IPs. You can usually configure this in your router settings.
---
Step 3: Connect Cameras to Your Wi-Fi Network

After your network is ready, it’s time to connect each camera. Though specific steps may vary depending on the brand and model, the general process is as follows:
1. Power Up the Camera
Plug the camera into an electrical outlet or use its battery if it’s a wireless model.
2. Install the Camera’s App
Most Wi-Fi cameras require a companion app, available in app stores, to facilitate the setup process. This app usually guides you step-by-step through the connection process.
3. Connect Each Camera
Using the app or the camera’s menu interface, connect the camera to your Wi-Fi network. You’ll generally have to input your network’s SSID and password. If you’ve set up a guest network specifically for cameras, ensure you select it.
4. Test the Connection
Once connected, stream live footage from the camera through the app to confirm functionality. Repeat this process for each camera.
---
Step 4: Organize and Manage Your Cameras
After you’ve connected multiple cameras to your Wi-Fi network, the key to long-term success lies in organization and management. Here’s how to streamline operations:
1. Use a Central Hub or App
Many camera ecosystems allow you to monitor all cameras from a single app or hub. For example, brands like Arlo, Ring, or Google Nest make it possible to view feeds from multiple devices in one place. If you’re combining different camera brands, consider using a third-party platform, such as Blue Iris or Synology Surveillance Station, which supports multiple manufacturers.
2. Set Rules and Alerts
Use the app to establish custom rules. For instance, you can configure motion detection alerts, set recording schedules, or activate privacy settings when you’re home.
3. Cloud or Local Storage?
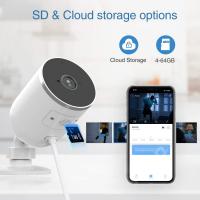
Decide whether you’ll store footage in the cloud or on local storage devices like SD cards or network-attached storage (NAS). Cloud storage often allows for remote access but requires a subscription; local storage avoids subscription fees but limits remote access options.
4. Name Each Camera
Rename your cameras in the app to reflect their locations (e.g., “Front Door,” “Living Room,” “Garage”), making it easier to monitor them at a glance.
---
Step 5: Troubleshooting Common Issues
Even with careful planning, issues can arise. Here are some common problems and solutions:
1. Connectivity Drops
If a camera frequently disconnects, check its Wi-Fi signal strength. Weak signals can be bolstered with a range extender or by repositioning the router.
2. Lagging or Choppy Video Feeds
This typically indicates insufficient bandwidth. Reduce the video resolution in the settings or upgrade your internet speed.
3. Power Issues
For battery-powered cameras that drain too quickly, adjust motion detection sensitivity or recording duration to conserve energy. For wired cameras, ensure the power supply is stable.
4. Firmware or App Updates
Outdated firmware or apps can lead to malfunctions. Regularly update both the cameras’ software and their companion apps to ensure stability.
---
Step 6: Scale Your System (Optional)
As your needs grow, you may want to add more cameras to your system. Always consider these points when scaling up:
1. Future-Proof Equipment
Choose cameras and routers that allow you to easily add more devices in the future.
2. Monitor Network Performance
Track how adding more cameras affects your network’s overall performance. If adding additional devices causes a dip in speed, upgrading your router or internet plan might be necessary.
3. Compatibility with Smart Systems
If your cameras are part of a smart home ecosystem, ensure new cameras integrate with existing systems.
---
Final Thoughts
Connecting multiple Wi-Fi cameras doesn’t have to be a daunting task. By carefully planning your layout, optimizing your network, and using tools designed for multi-camera systems, you can create a seamless and reliable surveillance setup. Whether you’re securing your home or monitoring a workspace, these steps ensure smooth connectivity and performance across all devices.
Remember, the key is preparation. A strong foundation—both physically and digitally—allows you to eliminate potential headaches and provides peace of mind, knowing your property is well-monitored. With this guide, you’re well-equipped to tackle any challenges that may arise, and you’ll soon have an efficient system tailored to your specific surveillance needs.


