How Do You Make A Metal Detector?
How to Make a Metal Detector: A Comprehensive Guide
Metal detectors are incredible tools used across a wide range of industries and hobbies. From treasure hunting on the beach to finding lost keys in your backyard, they offer practicality and fun. Many people might find themselves wondering: can you make your own metal detector at home? The answer is yes! This guide will walk you through the steps, equipment, and knowledge needed to build your own functional metal detector.
Whether you’re looking for a DIY project to take on or simply wish to understand how metal detectors work at a foundational level, this article explores everything you need to know. It’s worth mentioning that while homemade detectors can be fascinating projects, they won’t necessarily match the precision and sensitivity of commercially available devices. However, they can still be highly effective for casual use and learning purposes.
---
Understanding the Basics of Metal Detectors
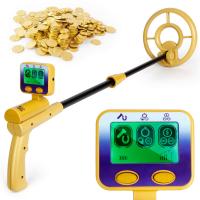
Before jumping into the construction process, it’s essential to understand how a metal detector functions. At its core, a metal detector operates by detecting electromagnetic signals. Its main components include:
1. Search Coil: The coil generates a magnetic field when electricity passes through it. This field reacts to conductive metals by creating a change in the electromagnetic signature.
2. Oscillator: Produces an electrical current that passes through the search coil.
3. Receiver/Amplifier: Detects changes in the magnetic field caused by metal objects and amplifies the signal.
4. Indicator System: Alerts the user, often via sound or light, when metal is detected.
The detector works by transmitting an electromagnetic field and listening for its reflection or disturbances caused by metal objects.
---
Planning Your DIY Metal Detector
Before diving into the actual process, it’s important to decide on the scope of your project. Is this for a specific purpose, such as finding nails in wood or coins in the ground? Depending on your goals, the complexity and materials required may vary. Here are popular methods to create a DIY metal detector.
---
Method 1: Using a Calculator and Radio
This is the simplest and most beginner-friendly way to create a metal detector. It requires minimal tools, is quick to assemble, and is effective for detecting small metal objects.
Materials Needed:
- A small portable AM/FM radio
- A simple handheld calculator
- Tape
- A plastic or cardboard structure (optional)
Steps:
1. Set the Radio Frequency: Turn the radio on and tune it to the AM mode. Adjust the frequency so it’s at the low end of the band (but not picking up any radio stations). You should hear static or white noise at this point.
2. Combine the Calculator and Radio: Place the calculator and radio back-to-back, with their components aligned. Tape them together securely.
3. Test the Setup: As you bring the combined calculator and radio setup near metal objects, you should notice changes in the static noise. This indicates the presence of metal.
How It Works: The calculator produces a small electromagnetic field. When this is near metal, the field interacts with the metal and alters the static noise on the AM radio.
This method is a great place to start if you’re looking for a basic, functional metal detector in no time.
---
Method 2: Building with a Simple Circuit
For those who have a little more time and a basic understanding of electronics, building a metal detector with a circuit provides better sensitivity and learning opportunities.
Materials Needed:
- A 555 timer IC (integrated circuit)
- Resistors (various values, e.g., 10k ohm, 1k ohm)
- Capacitors (e.g., 10 nF and 100nF)
- A copper wire coil
- Battery (e.g., 9V)
- Speaker or buzzer
- Breadboard and jumper wires for testing
Steps:
1. Design the Circuit: The 555 timer IC will act as an oscillator, creating an electromagnetic field in the copper wire coil. When the field is interrupted by metal, the circuit will react.
2. Create the Coil: Wrap the copper wire (about 25-30 turns) around a non-metallic object, such as a plastic tube or cardboard ring. This coil will serve as the magnetic field generator.
3. Assemble the Circuit: Using the breadboard, connect your 555 timer IC, resistors, capacitors, battery, and speaker according to a simple metal detector schematic available online. The coil attaches to the circuit as well.
4. Test and Calibrate: Power the circuit and test it by bringing various metal objects near the coil. The buzzer or speaker should emit a sound when metal is detected. If the sensitivity is too high or low, adjust your resistor or capacitor values.
How It Works: The oscillator circuit allows current to flow through the coil, generating an electromagnetic field. When the field is disturbed by conductive material, the speaker emits a sound to alert you.
This method offers better accuracy than the calculator-radio version and is a fun way to practice basic electronics skills.
---
Method 3: Using a Smartphone App
If you’re interested in a modern, low-effort approach, smartphones can also function as basic metal detectors with the help of their built-in sensors and apps available in app stores.
Materials Needed:
- A smartphone
- A metal detector app (freely available)
Steps:
1. Download the App: Search for and install a metal detector app.
2. Calibrate: Follow the app’s instructions to calibrate your phone’s sensors.
3. Detect Metal: Move the phone near metal objects and observe the app's feedback.
How It Works: These apps utilize the phone’s built-in magnetometer to sense changes in magnetic fields caused by metal objects. While they can’t replace a professional-grade detector, they can be useful for small-scale detections.
---
Tips for Enhancing Your DIY Metal Detector
1. Experiment with Different Coils: The size and number of turns in your coil affect its sensitivity. Larger coils can detect deeper objects, while smaller ones provide greater precision.
2. Use Quality Components: Higher-quality wires, capacitors, and resistors can make a noticeable difference in your detector’s functionality.
3. Add a Visual Indicator: While many DIY detectors use sound signals, you can add an LED that lights up when metal is detected for more versatility.
4. Calibrate Regularly: Ensure your detector is working optimally by testing and calibrating frequently.
---
Common Challenges and Troubleshooting
1. False Positives: Your detector might give signals in the absence of metal. This could be caused by electrical interference or unshielded components. Consider moving to an environment with less interference or redesigning your circuit.
2. Poor Sensitivity: If your detector isn’t performing well, check the connections, coil windings, or component placements. Adjust resistors and capacitors as needed.
3. Power Issues: Keep an eye on battery life, as low power can reduce effectiveness.
---
Applications of Your DIY Metal Detector
Once you’ve constructed your metal detector, you can use it for practical purposes such as:
- Finding lost metallic items like keys or jewelry.
- Locating hidden nails or screws in wooden structures before cutting or drilling.
- Educational demonstrations to learn about electromagnetism and electronics.
For hobbyists, it can even provide the satisfaction of unearthing coins, relics, or other treasures buried in the ground.
---
Final Thoughts
Creating a metal detector is a satisfying project that combines creativity, science, and problem-solving. By understanding the principles of operation and experimenting with different designs, you’ll learn a great deal about electronics and electromagnetic fields. Whether you build a simple calculator-radio detector or a more sophisticated one using custom circuitry, the process is both educational and rewarding.
While these devices may not rival commercial models, their ability to locate metal objects makes them excellent learning tools and functional gadgets for casual use. With patience and innovation, you can turn this DIY endeavor into an enjoyable, practical success.

